For more information, please contact Robert Michaels, rom@jlab.org,
Alexandre Camsonne, camsonne@jlab.org
Expert Call List
| Name | Phone | Status/detector | |
|---|---|---|---|
| Jessie Butler | (757) 269-5544 | jbutler@jlab.org | Hall A W/C |
| Jack Segal | (757) 320-9977 | segal@jlab.org | Detector Support |
| Kondo Gnanvo | (321) 604-8026 | kagnanvo@jlab.org | GEM |
| Nilanga Liyanage | (434) 924-6596 | nl8n@virginia.edu | GEM |
| Evaristo Cisbani | (757) 269-5584/+39 06 4990 2847 | cisbani@jlab.org | GEM |
| Brian Quinn | (412) 268-3523 | bquinn@cmu.edu | HCAL |
| Alexandre Camsonne | (757) 260-5064 | camsonne@jlab.org | DAQ |
| Scott Barcus | (757) 269-5352 | skbarcus@jlab.org | HCAL |
| Juan Carlos | (757) 741-8095 | cornejo@jlab.org | HCAL |
| Todd Averett | (757) 561-6702 | tdaver@wm.edu | GRINCH |
| Rachel Montgomery | 00 44 141 330 5531 | rmontgom@jlab.org | Timing Hodoscope |
| Arun Tadepalli | (757) 269-6989 | arunts@jlab.org | Shower, Pre-shower |
| Albert Shahinyan | (757) 269-5516 | shahinya@jlab.org | Webpage |
| Eric Fuchey | efuchey@jlab.org | Software | |
| David Flay | (914) 844-2927 | flay@jlab.org | Beamline, Target |
| Silviu Covrig Dusa | (843) 697-1753, (757) 269-6410 | covrig@jlab.org | Target 24/7 |
| Greg Smith | (757) 871-4371, (757) 269-5405 | smithg@jlab.org | Target 24/7 |
| Jian-Ping Chen | (757) 218-0722, (757) 269-7413 | jpchen@jlab.org | Target 24/7 |
| Donald Jones | (757) 768-1148 | tug38144@temple.edu | Run Coordinator Team Manager |
Shift Checklist
Albert's Shift Checklist
Official Shift Checklist
Target Training
Trained Operational Safety Procedure Form
Standard LH2 targets (for both A and C)
For more information, please contact Flay, David, flay@jlab.org
Meekins, David, meekins@jlab.org
Shift Leader
- Calculate ABU's when in production mode by counting good Coulombs per run: 150uA each hour = 0.54C. 1hour runs. For each hour long run(s) take #good-Coulombs/0.54C = #ABU's (even when running at a lower current, obsolete method: https://logbooks.jlab.org/entry/3785102)
- Communicate clearly and effectively with shift crews and MCC (7047)
- Arrive ~10 minutes early to your shift to talk with the previous shift crew
- Answer the phone
- Communicate with the RC
- Consult the Daily Run Plan and contact the run coordinator whenever problems happen that cannot be solved by shift workers
- Log any status information to the HALOG (Make sure to log in!)
- Maintain data taking quality and efficient use of beam time
- Use Panguin to evaluate data quality
- Post Snapshots with HALOG of important information at least twice a shift.
- Include- Hall A tools, BPM strip-charts, and BCM strip-charts.
- Include any snapshots of the details after a change
- Please feel free to post these Snapshots more often
- Sample screenshots to make during shifts (examples below during no-beam conditions, purely descriptive): collimator temp, Compton ion chambers, bpms, vacuums, parity controls, FFB, raster, ioc chamber
- Collimator and Beamline temperatures
- Hall A Beamline monitors, and Compton and Moller magnets, and bleedthrough check - useful for evaluating beam set up and tune
- Ion Chambers
- FFB system - these examples show the system while inactive - check a more recent log entry with active FFB for a prescriptive example
- Hall A Raster
- Hall A Tools, magnets
- Hall A Target status
- Scaler GUI
- Injector Loss Monitor - useful for diagnosing large Aq widths and noise problems
- Charge Feedback Monitor
- Compton
- Target motion and mask
- Beamline Vacuum
- Parity Controls
- Keep track of beam time accounting
- Follow the directives in the COO!
- Log the following in an end of shift summary in the HALOG:
- run list (describing the goal of this run: eg production on Pb, BCM calibration...) and report main statistic numbers
- any major events, including hall access (in addition to making log entries when they happen)
- Complete the Shift Checklist at the beginning of the shift - see Instructions
- Note: There is a convenient script in ~/cameronc/SL/auto-SL.sh which will walk you through the steps of the shift checklist and provide easily copyable text-outputs for easy entry into the checklist and comparison with expectations
- Print off additional run sheets (printer "chax"): https://logbooks.jlab.org/entry/3700479
- A GMn analysis shift worker will be on hand for most shifts (although not required by the COO) to help out in high demand situations. Please coordinate with them as well.
- Read Common Problems for information on how to deal with common issues cropping up
Run Plan
Daily Run Plan
Global Run Plan
Overview Table
For more information, please contact Bogdan Wojtsekhowski, bogdanw@jlab.org
Pre-Shower/Shower
Presentations
BigBite shower and preshower current status - 10 Jan 2021BigBite shower and preshower current status - 14 Sep 2020
Preshower and shower disassembling/reassembling status - 24 Feb 2020
Preshower disassembling/reassembling - 17 Feb 2020
GEMs
Presentations
PREX GEM data analysis - 8 Feb 2021INFN GEM Status - 31 Aug 2020
INFN GEM Cosmic Ray Analysis Status (3) - 12 Dec 2019
INFN GEM Cosmic Ray Analysis Status (2) - 12 Dec 2019
INFN GEM Cosmic Ray Analysis Status (1) - 7 Nov 2019
Status of UVA GEM setup in EEL clean room (3) - 19 Dec 2019
Status of UVA GEM setup in EEL clean room (2) - 19 Dec 2019
Status of UVA GEM setup in EEL clean room (1) - 10 Oct 2019
Update on UVa GEMs - 25 Apr 2019
Preliminary Drawings of SBS FT GEMs with U-V Strips - 16 Jan 2019
INFN GEM – update - 25 May 2019
GMN GEM analysis and GEM DAQ update - 23 May 2019
FT GEM (commissioning) status - 16 May 2019
SBS GEM Test
BigBite GEM digitization - 15 Nov 2017
BigBite DAQ
Trigger GroupsTrigger Logic
Cabling Maps
Cabling Paths
Presentations
https://hallaweb.jlab.org/12GeV/SuperBigBite/SBS-minutes/2019/C.Ayerbe-GRINCH_DAQ-20190109.pdfhttps://hallaweb.jlab.org/12GeV/SuperBigBite/SBS-minutes/2018/GEMAnalysisAndDAQUpdate_Danning_SBS_WeeklyMeeting_05232018.pdf
https://hallaweb.jlab.org/12GeV/SuperBigBite/SBS-minutes/2018/C.Ayerbe-GRINCH_DAQ-20180110.pdf
https://hallaweb.jlab.org/12GeV/SuperBigBite/SBS-minutes/2016/tortorici_DAQ_preparation_8.pdf
https://hallaweb.jlab.org/12GeV/SuperBigBite/SBS-minutes/2016/DAQ_preparation_7.pdf
https://hallaweb.jlab.org/12GeV/SuperBigBite/SBS-minutes/2016/DAQ_preparation_6.pdf
https://hallaweb.jlab.org/12GeV/SuperBigBite/SBS-minutes/2016/1611_SBS_DAQ_DOE_review_v1.pdf
SuperBigBite DAQ
Schematic
DAQPresentations
https://hallaweb.jlab.org/12GeV/SuperBigBite/SBS-minutes/2018/SBS-DAQ-Apr-25-2018.pdf
https://hallaweb.jlab.org/12GeV/SuperBigBite/SBS-minutes/2018/GEMAnalysisAndDAQUpdate_Danning_SBS_WeeklyMeeting_05232018.pdf
https://hallaweb.jlab.org/12GeV/SuperBigBite/SBS-minutes/2017/SBS-HCAL-DAQ-Sept-20-2017.pdf
https://hallaweb.jlab.org/12GeV/SuperBigBite/SBS-minutes/2017/SBS-DAQ-update-Mar15-2017.pdf
https://hallaweb.jlab.org/12GeV/SuperBigBite/SBS-minutes/2016/tortorici_DAQ_preparation_8.pdf
https://hallaweb.jlab.org/12GeV/SuperBigBite/SBS-minutes/2016/DAQ_preparation_7.pdf
https://hallaweb.jlab.org/12GeV/SuperBigBite/SBS-minutes/2016/DAQ_preparation_6.pdf
https://hallaweb.jlab.org/12GeV/SuperBigBite/SBS-minutes/2016/1611_SBS_DAQ_DOE_review_v1.pdf
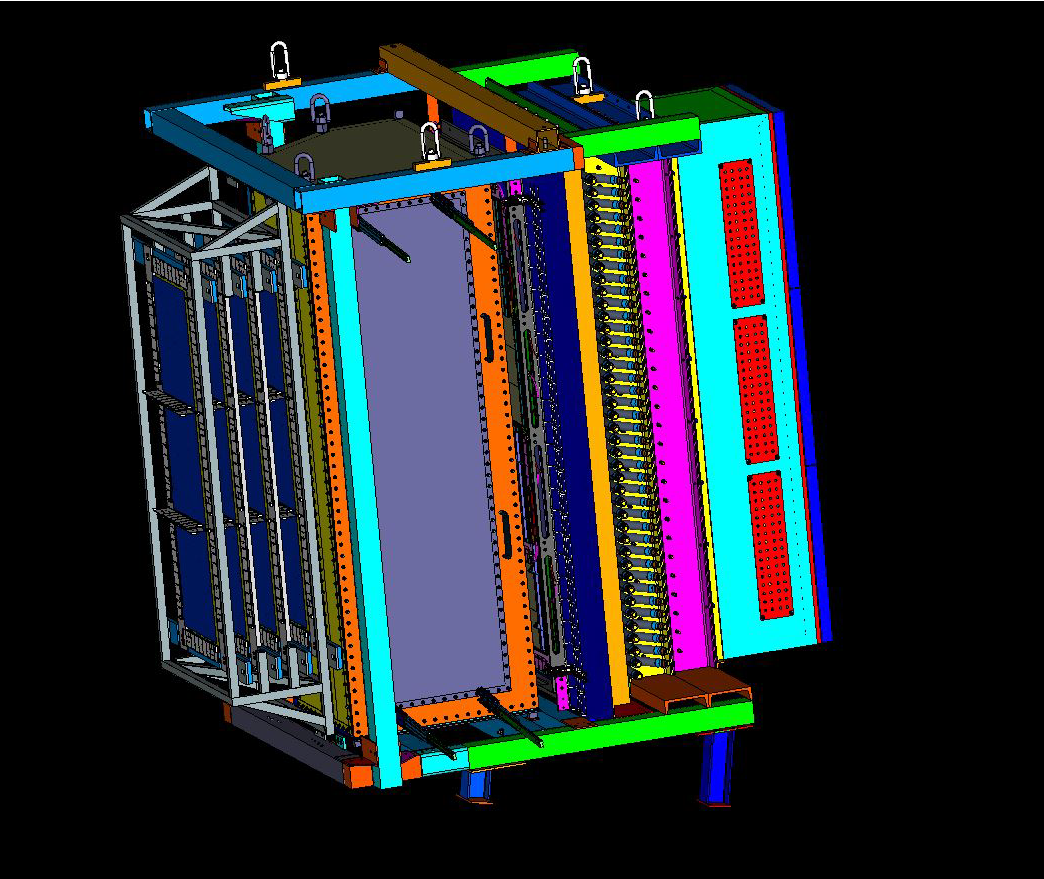
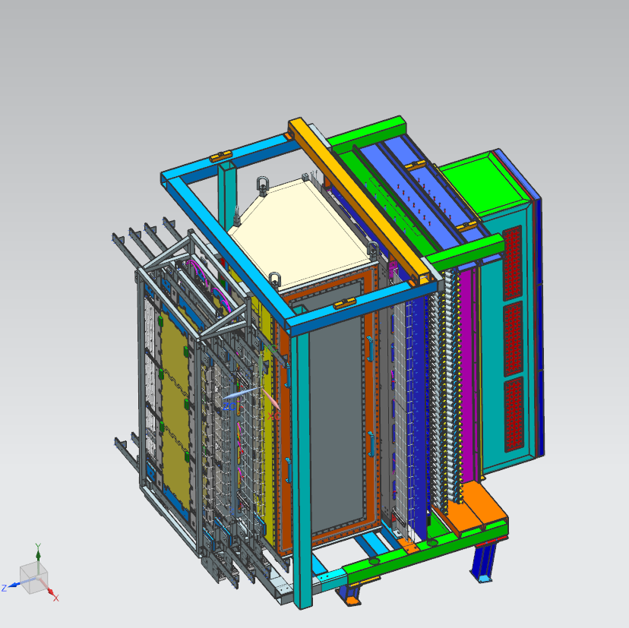
HCal
Presentations
https://hallaweb.jlab.org/12GeV/SuperBigBite/SBS-minutes/2021/HCal_Tasks_3_15_2021_Scott_Barcus.pdfhttps://hallaweb.jlab.org/12GeV/SuperBigBite/SBS-minutes/2019/cornejo_20190718_brief_hcal_update.pdf
https://hallaweb.jlab.org/12GeV/SuperBigBite/SBS-minutes/2019/Cornejo_HCAL_20190116.pdf
https://hallaweb.jlab.org/12GeV/SuperBigBite/SBS-minutes/2018/HCal_update_Aug_07_2018.pdf
https://hallaweb.jlab.org/12GeV/SuperBigBite/SBS-minutes/2018/HCal_Status_Sept_05_2018.pdf
https://hallaweb.jlab.org/12GeV/SuperBigBite/SBS-minutes/2018/HCAL_Update_2018-Oct-17_final-v2.pdf
GRINCH
Presentations
https://hallaweb.jlab.org/12GeV/SuperBigBite/SBS-minutes/2020/GRINCH_2020-11-16_Bradley_Yale.pdfhttps://hallaweb.jlab.org/12GeV/SuperBigBite/SBS-minutes/2019/C.Ayerbe_GRINCH-Report_20190425.pdf
https://hallaweb.jlab.org/12GeV/SuperBigBite/SBS-minutes/2019/2019-11-21_GRINCHStatus.pdf
https://hallaweb.jlab.org/12GeV/SuperBigBite/SBS-minutes/2018/SBS_GRINCH_update_12-Sept-2018.pdf
https://hallaweb.jlab.org/12GeV/SuperBigBite/SBS-minutes/2018/C.Ayerbe-GRINCH_DAQ-20180110.pdf
https://hallaweb.jlab.org/12GeV/SuperBigBite/SBS-minutes/2017/GRINCH_Apr_2017_Update.pdf
Timing Hodoscope
Description
Description of Timing HodoscopeBigBite Timing Hodoscope Overview and Mapping
Presentations
BigBite Timing Hodoscope Update (2) - 17 July 2019BigBite Hodoscope Update (1) - 26 June 2019
Draft: Observations and Recommendation on the Rebuilding of Hodoscope Bars for the Big Bite Spectrometer - 10 May 2020
BigBite Timing Hodoscope SBS Weekly Meeting Update Hall A Jefferson Lab - 21 September 2020
|
|
|
|
|
|
|---|---|---|---|---|
| RC | https://jlab-org.zoomgov.com/j/1619032184?pwd=aWhTVWxya1ZZQzA1K2ZPSTd2ZXZ2QT09 | Donald Jones | jonesdc@jlab.org | Daily 3:15 PM |
| SBS | https://jlab-org.zoomgov.com/j/1604799351?pwd=Y1RLSDVrVWlhQTNyZ3JHMUxvZGFyQT09 | Bogdan Wojtsekhowsk | bogdanw@jlab.org | Monday 11:00 AM |
| DAQ | https://jlab-org.zoomgov.com/j/1619602450?pwd=ZmxNSmovaW93dFpTT3VIYkwzUXNKQT09 | Alexandre Camsonne | camsonne@jlab.org | Friday 10:30 AM |
| GEMs | https://jlab-org.zoomgov.com/j/1610639586?pwd=TnJoQ3Y5a29xR2RnNDl5eHhqVGRxdz09 | Kondo Gnanvo | kagnanvo@jlab.org | Wednesday 10:30 AM |
| HCal | https://bluejeans.com/594276564 | Scott Barcus | skbarcus@jlab.org | Wesnesday 11:00 AM |
| Software | https://jlab-org.zoomgov.com/j/1616394710?pwd=RVdMY2ZBRkJyTDBoMWFwamJ4aHpmZz09 | Andrew Puckett | puckett@jlab.org | Friday 1:00 PM |
For more information, please contact Nandhu Sridhar, nandhu@jlab.org
GMn Experiment
For more information, contact Albert Shahinyan, shahinya@jlab.org
For more information, please contact Ed Folts, folts@jlab.org
GMn Safety Documents
*
*
For more information, please contact Brian Quinn, bquinn@cmu.edu, bquinn@jlab.org
Experiment
Detectors

Physics Documents
Logbook
New Electronic LogbookPictures


Analysis
Software
SBS replay
SBS offline
g4sbs
Documentation of g4sbs
SBS Analysis Software Status
General Contact Information
| Name | Phone Number | |
|---|---|---|
| MCC | 757-269-7046, 757-269-7047, 757-269-7048 | |
| Run coordinator | 757-876-1787 | |
| Crew chief | 757-269-7045 | |
| RadCon | 757-876-1743 | |
| Hall A Counting house | 757-269-5501, 757-269-5507 | |
| Cynthia Keppel Hall A/C Leader | 757-269-7580 | keppel@jlab.org |
| Jessie Butler Hall A Work Coordinator | 757-269- 5544 | jbutler@jlab.org |
| Jack Segal Hall A/C Detector Support | 757-320-9977 | segal@jlab.org |
| Guard house | 757-269-5822 |
Experiment Contact Person Information
| Name | Phone Number | |
|---|---|---|
| Bogdan Wojtsekhowski, GMn | 757-269-7191 | bogdanw@jlab.org |
| Andrew Puckett, WAPP | 860-468-7137 | puckett@jlab.org |
| Eric Fuchey, nTPE | efuchey@jlab.org | |
| Brad Sawatzky, GEn-recoil | 757-269-5947 | brads@jlab.org |
| Alexandre Camsonne, GMn spokesperson | 757-260-5064 | camsonne@jlab.org |