PVDIS How To Page
last updated:
Note to expert: if you
edit this file on your own PC, please make sure you copy the latest web
version to start from. Other experts update this file frequently!.
-
- In
the production mode of this experiment, the PVDIS DAQ is a combination
of the PVDIS electronics and the HAPPEX DAQ. The HAPPEX DAQ is used to
readout data. Periodically, we also use the HRS data acquisition system
for systematic studies.
HAPPEX/PVDIS Data Acquisition (Updated Nov 4, 2009)
-
HAPPEX Data Analysis (Updated 11/04/09)
-
Spectrometer
Target How to (updated 11/5/09)
-
Spectrometer Data Acquisition
-
Spectrometer Data Analysis
-
Hall A Detectors (Updated [date])
-
Compton Polarimeter
-
Helicity Controls
-
Miscellaneous
-
Other Problems
Shift Worker Responsibilities
Shift Leader:
- follow the runplan and communicate with RC or experts whenever problems happen that cannot be solved by shift workers.
- make sure data taking quality and an efficient use of beam time.
- In addition to the items above and obvious stuff as defined in the COO, please log in shift summary:
- production run list (PVDIS DAQ runs);
- spectrometer run numbers that were taken during the same time;
- any spectrometer runs that were taken at low current with VDC on. Experts could use these to analyze the DAQ.
Target Operator:
Third person:
- Do online replay of all production PVDIS runs;
- Do online replay of checkout runs (these are typically low currnt runs);
- Do online replay for spectrometer runs that are taken at the same time as production PVDIS runs;
- COmpare all replay histograms with the sample ones and report to shift leader any unexplained differences. Halog them.
- If one person cannot complete all replays, shift leader or TO can help.
HAPPEX/PVDIS Data Acquisition
Note: This is for HAPPEX DAQ. If you want to
cold start spectrometer DAQ see
Spectrometer DAQ cold start.
-
Do the following at a shell prompt on adaql1 on
the apar account. This does a kcoda, etc, for you:
> startcoda
-
The Runcontrol GUI will start up. Now click on the Connect
button.
-
Wait 10 seconds, then click on Configure. A
dialog box pops up and you must choose the configuration you want,
which is presumably HAPPEX.
           List of Useful DAQ Configs

 All these can be used for the experiment.  Ask the RC which is preferred at the moment.

   Pvdis -- Full config, all crates.
   PvdNoQweak -- Full config minus the Qweak crate (it's less important and may have crashed)
Wait for configuration to finish (see messages in text box at
lower left), then click Download.
Wait for that to finish. Now you can click Start Run
to start a run (see section on Running CODA).
In another workspace, open up xterms for monitoring the ROCs by
starting the ROC IT GUI:
> roc_it
Click on OPEN ALL. An xterm should open for each IOC.
If you are asked for a login name, use adaq as the user.
The password is the same as in the counting house computers.
NOTE: After HAPPEX DAQ start, ensure that the dithering and asymmetry charge feedback is turned back on.
-
Log in if necessary to adaql1 on the apar
account
Bring up a greenmonster terminal by typing
> greenmonster
On the GreenMonster gui, click on BMW tab
To check the current dithering status, click on
> Check Status
- If the dithering is turned on , then Beam Modulation is ON is displayed to the right of Check Status tab. The tab to the left of Check Status tab will appear as Set Kill Switch, with Kill Switch is OFF message displayed above it. To turn it off click on
> Set Kill Switch
- Wait for a couple of seconds and click on
> Check Status
to ensure that the dithering has indeed been turned off.
- If the dithering is turned off , then Beam Modulation is OFF is displayed to the right of Check Status tab. Dithering can be turned back on by simply clicking
> Enable Modulation On
-
Ensure that the dithering is turned on by clicking
> Check Status
- It takes greenmonster a couple of seconds to get the current dithering status, so give it some time.
- NOTE If reboot the parity daq crate (ROC 23, halladaq6, hatsv9 2004)
you will need to restart dithering!
-
Log in if necessary to adaql1 on the apar
account
-
To check status of feedback system and polarized source, type at
shell prompt:
> runbird
Help is available using the Help button at the
bottom. Settings and numbers to expect can be found in the White Bound
Shift Worker Folder.
-
To set/check status of HAPPEX ADCs and timing boads, type at shell prompt:
> greenmonster
Click on tabs at top to examine ADCs in different crates or
timing.
-
If a run is in progress, end it. If you can't end it, close the CODA GUI window.
-
There should be xterms open for each roc in the ROCS
workspace. In the desired xterm, click ENTER a few
times to check communication to the IOC. Then type:
> reboot
-
The IOC will then proceed through its booting sequence. It is
ready when either of these messages appear (e.g. for ROC23/halladaq6):
"ROC23" state now "booted"
Done executing startup script
/adaqfs/halla/apar/vxworks/halladaq6.boot
- New ! (Nov 9, 2009) Power-Cycling the Injector Crates
- Necessary when ROC31 (aka g0inj) or ROC24 (aka happexinj) get hung up.
- Go to http://g0injreboot.acc.jlab.org and enter the user/password which are written on the "Passwords" sheet near the whiteboard.
- Click "Control Action" and select "Immediate Off", then click the "Apply" button.
- Wait a few seconds, then "Control Action" and "Immediate On" and "Apply".
-
In the runcontrol GUI,
click Abort
click Reset
click Download
-
Start a new run.
HAPPEX crates
| ROC |
Description
|
Location |
IP Address |
Portserver |
| TS1 |
Trigger Supervisor |
Counting Room |
happex4 |
hatsv9 port 3 |
| ROC23 |
CH Crate |
Counting Room |
halladaq6 |
hatsv9 port 4 |
| ROC26 |
R-arm Detectors |
R-HRS Det. Stack |
happex7 |
hatsv10 port 5 |
| ROC25 |
L-HRS Timing Board |
L-HRS Det. Stack |
hallavme14 |
hatsv40 port 5 |
| ROC28 |
R-arm PVDIS |
near R-HRS Fastbus |
pvdis1 |
hatsv10 port 4 |
| ROC29 |
L-arm PVDIS |
near L-HRS Fastbus |
pvdis2 |
hatsv4 port 5 |
| ROC24 |
Happex Inj Crate |
Injector Serv. Bldg. |
halladaq19 |
hatsv18 port 4 |
| ROC31 |
Qweak Injector Crate |
Injector Serv. Bldg. |
g0inj |
hatsv18 port 5 |
Note: This is for HAPPEX DAQ. If you want to run
CODA for spectrometer DAQ see
Running CODA for spectrometer DAQ.
-
Log in, if necessary, to adaql1 as user apar
-
The Runcontrol GUI may be already running. If not, see section
HAPPEX DAQ cold start. To start and
stop
runs, click on the buttons Start Run and End
Run. Start Run is the same as the sequence
Prestart, Go.
Be sure to enable the online
data monitor before starting the run, if you wish to use it during
the run.
- Start a new run EVERY hour, even with no beam.
Runs without beam are important for Electronics Crosstalk Analysis.
If the CODA is in Pvdis configuration, and you start getting ROC 31
errors, it is due to the Qweak crate being hung up. If you cannot reboot ROC31 quickly,
then the interest of
not losing any beam time, we should simply switch over to some other
configuration, preferably to PvdNoQweak configuration, which has all the crates but ROC 31.
Note: How to Power-Cycling the Injector Crates via http://g0injreboot.acc.jlab.org see Rebooting HAPPEX crates.
To switch the configuration (in case you cannot reboot ROC31 quickly):
In runControl, press Reset .
Click on Configuration tab, and select PvdNoQweak
Click on Download tab.
If later on, ROC 31 is rebooted, and we want to go back to Pvdis configuration, then follow the set of instructions outlined above replacing instances of PvdNoQweak with Pvdis .
HAPPEX/PVDIS Data Analysis
Online Data Monitor (up to date as of 11-04-09). Click here for a one-page summary.
-
HAPPEX online data monitor (PANGUIN) normally starts up at start
of run. To disable this "background process" enter at a shell prompt:
> panguin off
To re-enable it enter:
> panguin on
These commands have no immediate effect on
analysis, but govern whether or not analysis will start at the start of
the next run.
-
To monitor data online, log into adaql1 with the apar
account and type at a shell prompt:
> gopan
> online -f pvdis
- or
> gopan
> pan
> online("panguin/pvdis")
A fairly self-evident GUI will appear. Select various pages
of plots using the buttons on the left.
NOTE: Please be warned that the GUI might
crash for several reasons. Making it work again could simply be a matter of
closing the window and restarting it. If at any point the GUI stops working
and restarting does not work, then you you must do a
HAPPEX/PVDIS DAQ cold start.
- Compare histograms and strip charts of Online GUI with sample
Prompt Analysis plots. Inform shift leader if there is any suspectible
difference.
- (to be updated) Here is a list of what shift workers should look at when monitoring online:
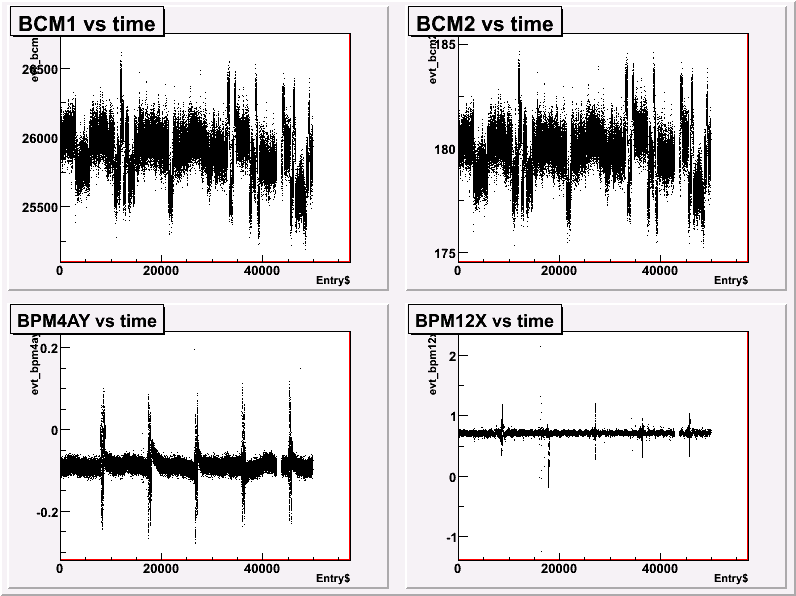
- There should be at least two BCMs in the 'BCMs 1-2 1D'
tab with a healthy signal. A healthy signal can be characteized as
being at or above 25,000 channels (except for BCM2, connected to an
18-bit ADC, which should be more than 150,000 channels).

- There should be at least four BCMs in the 'BCMs 1u,1d, L&R' tab with
a healthy signal. A healthy signal can be characteized as being correlated with the beam current <- update this for PVDIS!
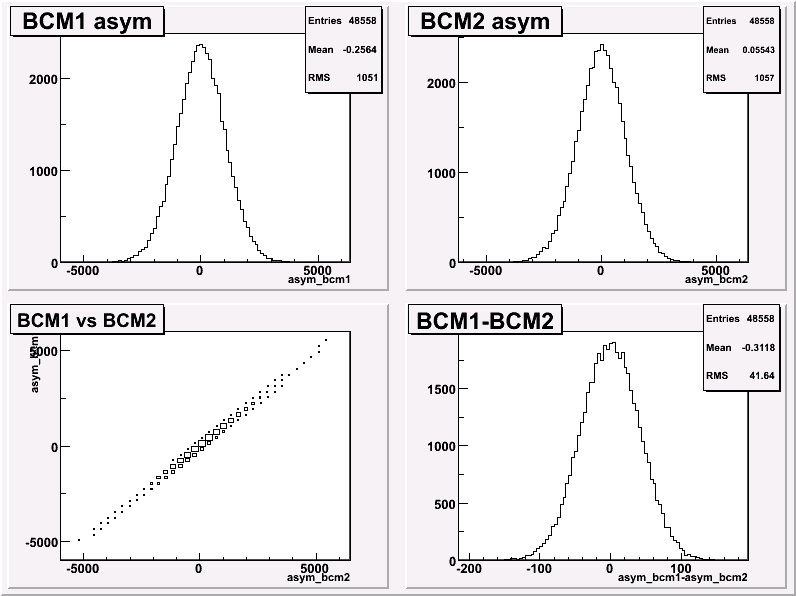
- In the 'BCM asymmetries' tab, the histograms shown should be centered
at around zero and should agree with each other. Otherwise, Pockels Cell voltages might need to be adjusted so we
can get them to zero.
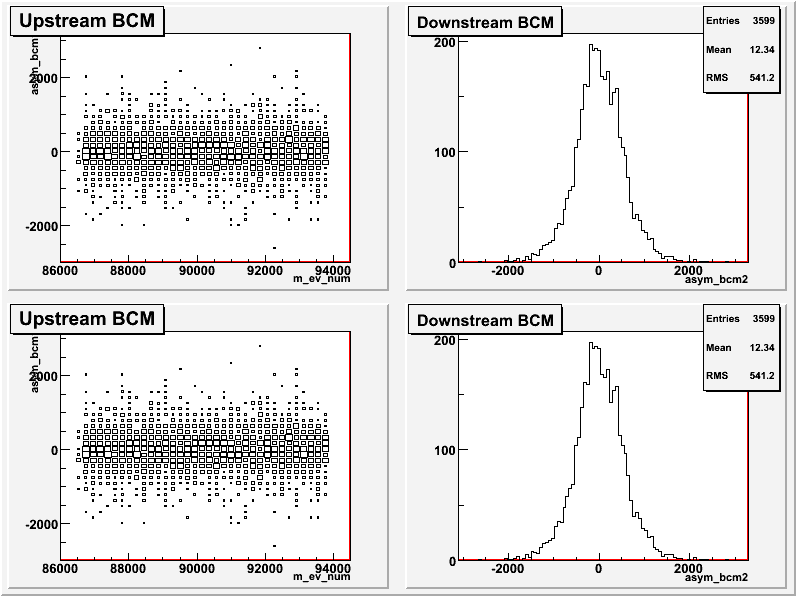
- In the 'BCM asymmetry correlations' tab, the histograms
shown should be a nice skinny diagonal distribution near zero in both
axes. Otherwise, something is wrong with the BCM signals in the
PVDIS crate. <- update this for PVDIS!
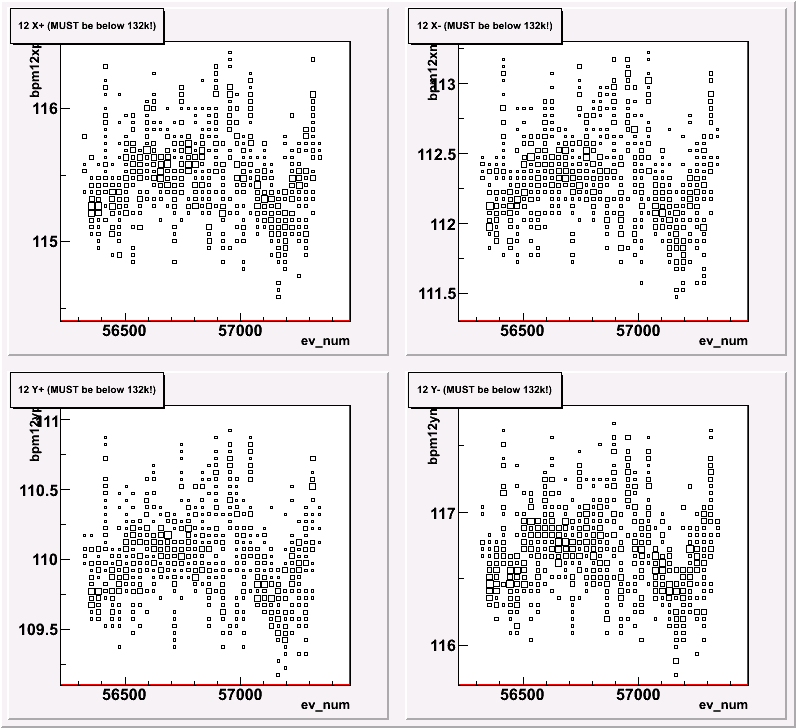
- The BPM12 wires
tab shows 4 plots. The mean on all these plots will normally be about
85000 channels and should be less than 130,000 channels. If these
signals saturate, it would be a disaster for the experiment! For
detailed instructions of what to do when these signals saturate, click here.
 .
.
- The HAPPEX detectors shown in the 'HAPPEX Detector Signal and Correlations' tab should also have healthy signals. In this case, the signals should be:
- More than 40,000 for det1
- More than 150,000 for det2
Some more detailed instructions can be found here. The Detector vs. BCM plots, located in the same tab, should show good correlation. <- remove this for PVDIS! - Do we have similar checks for PVDIS signals???

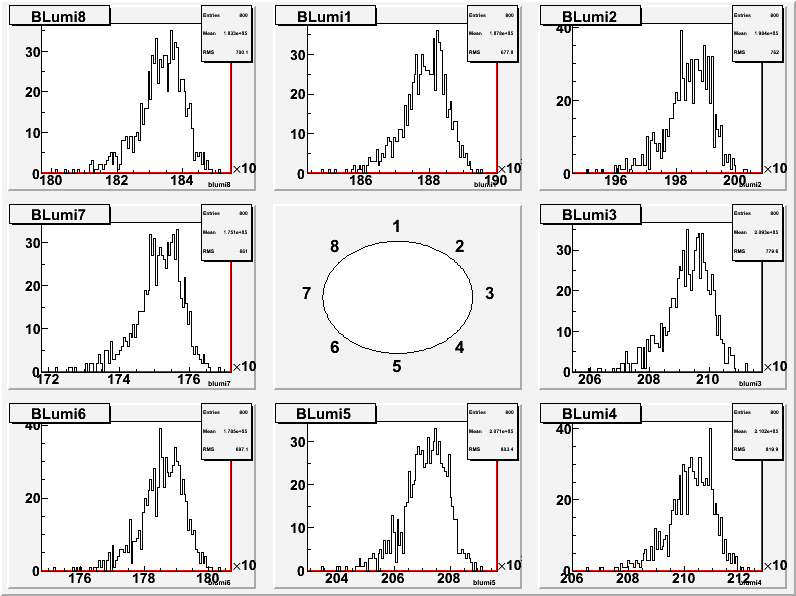
- The Luminosity Monitors in the 'Blumi vs event number'
tab should have healthy signals. Ideally, the signals should be at
around 200,000 channels. If they are not, the HVs can be calibrated by
connecting to the Right Arm HV crate and looking at slot 15. This
should only be done after consulting with an expert, such as Rupesh
Silwal, Luis Mercado or Dustin McNulty.<- update this for PVDIS?
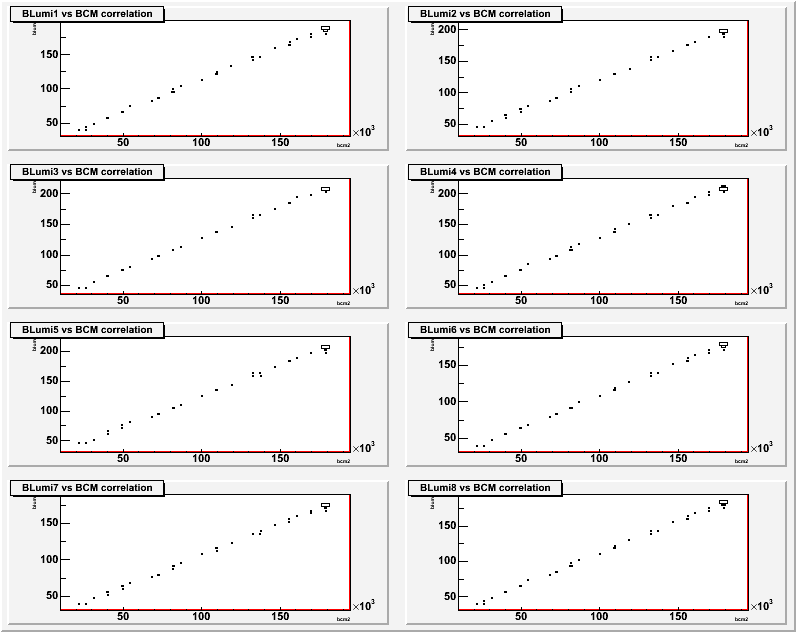
- Blumi vs BCM should show good correlation for all the signals.<- add bcm u1/d1 L&R for PVDIS?
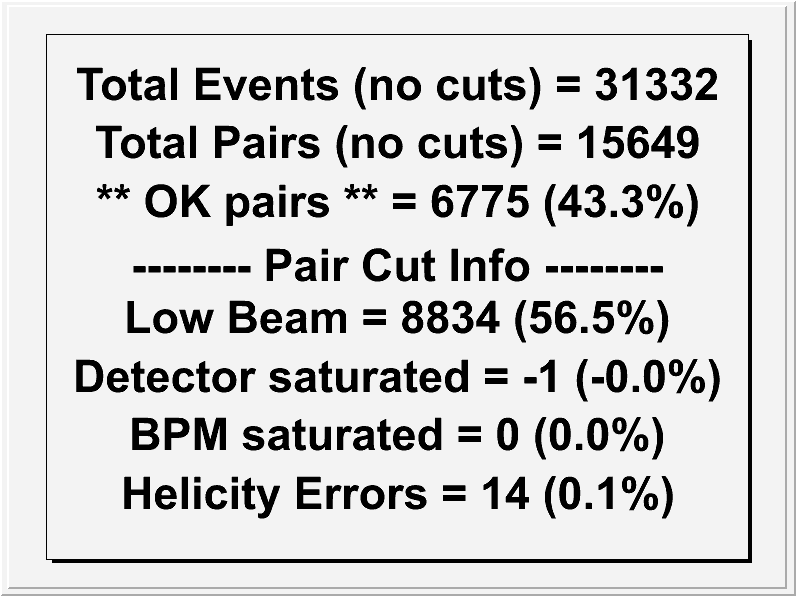
- The Total Pairs and Cuts tab should be examined during the run. This records how efficient our data taking is.<- does this stays unchanged for PVDIS?
Starting prompt analysis (up to date as of 11-04-09). Click here for a one-page summary.
-
The HAPPEX Prompt analysis is comparable to the Detector and
Physics replay that is done with the Hall-A Analyzer.
- Log into
adaql5 or adaql6 with
the apar account.
DO NOT PERFORM PROMPT ANALYSIS ON adaql1, adaql2 or adaql3!!!
- Do NOT do prompt analysis for a run untile it has ENDED.
- At the shell prompt, type:
> gopan
> prompt runnumber
- Prompt Analysis will then proceed with decoding the raw CODA
data into Helicity Correlated Asymmetries and Position Differences,
done by the Parity ANalyzer (PAN). This is followed by the Regression
and Dithering Analysis (REDANA), which corrects the raw asymmetries for
detector sensitivities to beam parameters.
- The Online GUI will open a window presenting histograms and
stripcharts for the requested runnumber. Check these versus the sample
Prompt Analysis plots (should be in a white bound folder). Any strange
deviations from the sample plots should be brought to someone's
attention (Shift Leader, Run Coordinator) and shown in the HALOG. The reference plots (need to be updated) are shown below:
| | | changes to be made for PVDIS |
 |
 |
 | Fig. 1 and 2 should have one of the
PVDIS bcm copies. Fig. 3 should have
(or another page should be added) for
the asymmetry of PVDIS bcm copies,
and their correlation with bcm1 or bcm2. |
 |
 |
 | These 3 can stay the same |
 |
 |
 | Fig. 7 and 8 should be replaced by PVDIS
signals. Suggest rate and asymmetries of:
e4n, e4w, e5n, e5w, pi4n, pi4w, pi5n, piw,
and the overall en, ew, pin, piw, for both
left and right arms. |
- If you start a prompt analysis before a run is finished, or for
some reason you need to force the reanalysis of a run then use:
> gopan
> reprompt runnumber
- Once in a while, print out the text output files and put them
in
the binder (taking advantage of the opportunity to look them over and
compare them to previous runs, of course). The print command is
(after doing
$ gopan) e.g.
$ chaprint_text
prompt_output/*_224*
to print outputs from runs 2240 to 2249.
Spectrometer
-
In the HAC control
window, press the "Alarm
Handler" label in the tools launcher. When an alarm is
triggered, the bottom "Alarm Handler" will flash, then you can press
there to see where the problem is.
-
The machine to run HAC is hacsbc2, the second
machine from
left. At the bottom of the screen is the Linux taskbar. The sixth
symbol is tools launcher. Pressing the arrowhead
opens a menu which has:
- Alarm Handler, bogies_LEFT, bogies_RIGHT,
bogies_SetSpec, JavaArchiverClient,
- Menu_Accelerator, Menu_ESR, Menu_HallA,
snapshot, StripTool
Pressing the "Menu_HallA" label launches a subscreen titled
"Hall A Main Menu". One of the entries is labelled "Tools". Pressing
on the "Tool" button opens the "Hall A General Tools" screen as
follows, which is often referred to as the HAC window. The old version
of HAC can be found at http://hallaweb.jlab.org/document/OPMAN/node179.html.
-
From the HAC control
window, there is
a P0 SET field for each spectrometer in which you can enter the
desired momentum setting. To change to a lower momentum from a higher
previous setting, you just need to enter the momentum value. To bring
the momentum setting up, you need to recycle the magnets for
Q2 and Q3 of either arm. That is
increase the current of Q2/Q3 to 1600 A for the Left arm or 1400 for
the Right arm, wait for 2 minutes after they reach max, then tune down
the value to the desired setting. More detailed instructions are on
the white board of the counting house. There's no need to recycle
magnets for Q1 and Dipole.
- Procedure to reset the dipole momenta (eg. after a reboot of the
magnet controls IOC):
- Look up (in the runsheets or the whiteboard) the desired SET
current in the dipole magnet power supply.
- Turn OFF the field regulator in the dipole nmr field control
gui.
- Set the desired momentum in the hall A tools screen (set the
"P0").
- Enter the desired SET current in the dipole magnet power
supply.
- Wait for the momentum setting of the dipole to reach
within ~0.5% of the desired momentum.
- Turn ON the field regulator.
- Eventually, the regulator will automatically enter a new
set
current that will take the dipole directly to the desired momentum.
Note:
- left dipole SET current ≁ (left dipole READ
current)/(0.944)
- right dipole SET current ≁ (right dipole READ
current)/(1.005)
[This is a modified version of
HAlog entry 129538].
This is for Q1 recovery after it trips. Never use the following
instruction if Q1 works fine.
- Go to
Hall
A tools screen and press the blue button next to "I(A)" for
left or right HRS (depending on which one is having problems). Click on
"Q1 power supply", this will pop up the window for power supply
control.
- Usually after a trip, the Q1 current will drop to zero, some
fault
messages will show in red, and the power supply is off. Press the
"Reset" button to clear the faults and wait, for an example see halog
152379.
Note that "MAGNET MISMATCH" will remain on because the current readback
does not match the set point.
- Try to turn on the power supply by clicking on "POWER ON". If it
does not turn itself on, try the following:
- Go to the middle room, look for a "Reset switch box #1" in rack
CH01B04, press the green button labeled "left Q1 local control reset"
or "right Q1 local control reset";
- Go back to the control window and click on "POWER ON" again. If
it still does not turn itself on, a controlled access is needed. In
this case, consult the run coordinator first, and
then go down to the hall.
- Go to Q1 power supply, put into local mode (a button).
- Press "reset", then "power on", then press local mode button
again to go into remote (its a 2-state button). This might suffice.
Ask shift crew to turn on magnet... see if it works.
- If this doesn't work, which happens all the time, then:
- Go to the key panel on row of equipment behind Q1 PS
(toward
target), press yellow button under key switch.
- And press tiny blue reset on back of this panel. There
is a
big sign pointing to this tiny button.
- Repeat step 2.
- Now the power supply should be on. If it is not, you didn't do
the above procedure correctly. In the control window, enter
set current. If a set current is already there, check if it is the
same as previous runs (check the runsheets). Wait for the magnet to
ramp up.
Target How to
Target Important Notice:
- For
the safe operation of the cryotarget, whenever there is a major event
(such as power outage, cryo (CHL/ESR) crash) which significantly
affects the target operation, or there is an alarm you don't know how
to deal with, or any situation you are not sure what to do, please call
the target-on-call!
Target Status for PVDIS:
- Loop
1 has LD2 target operating at 22K and 25 psi. Loop 2 and Loop 3 are not
being used, filled with helium gas at the moment. PVDIS has the
highest demand ever in beam power (over 100uA on 20-cm LD2 cell) and
therefore the highest demand on cryogenical cooling power. Due to
insufficient cooling power from the ESR 15K coolant, we are using 4K
coolant directly from CHL. This significantly increases the
chance of freezing the deuterium target which has a frozen point of
19K. Target operators should pay close attention to the temperature and
high power heater status to prevent the target from freezing.
-
The target temperature is displayed
on the target charts running on poltarac as well as
- For PVDIS, the cryotarget is in loop 1, a 20-cm LD2 cell. It's temperature should be kept at 22K.
What to do if target temperature drops fast?
- When you see the temperature drops significantly, it probably is an
indication that we do not have enough heating power (either from beam or
high power heater), which probably indicates that the PID control of high
power heater is not working properly. In this case, you should use the local
heater poper supply in the middle room (top one is for loop 1) to keep
temperature from dropping too much.
- If the local heat power supply also fails, you should reduce the coolant
supply by closing down the J-T valve (at a rate of 2% per minute). Always be
gentle when adjust J-T valve, too fast could cause cryo-crashing.
- If you are
not sure what to do, call the target-on-call.
- Before you start reboot ioc, you NEED to turn on and set the local
auxiliary heater power in a rack in the middle room (top one is for loop 1).
Set the voltage to be slightly lower than the value you are running the
heater from PID control. THIS IS IMPORTANT to prevent target from freezing
since when
ioc comes back, the PID control will turn the remote heater power to zero.
- Type "http://hareboot7" in a web browser and enter the username:
hlauser and passwd (on the list posted on the wall next to the whiteboard)
- Select "Immediate Reboot" under "Control Action" for outlet 5 and 6
(iocha13);
- Click "Apply", wait for IOC to come back, and be patient. It takes a
few minutes.
- When ioc comes back. the remote heater power will start at zero, which
is the time the local auxiliary heater kicks in to keep the target
temperature from dropping too fast.
- After the PID re-established the proper value for the remote heater
power, it will take over automatically. You can turn off the local auxiliary
heater power when the system becomes stable.
- If the IOC stills behaves odd, call the target on-call.
- Pay attention to alarms. Make sure you know what caused the alarms and take
care of them.
If you are not sure, please call the target-on-call.
-
For any major events (such as power outage,
cryo (CHL/ESR) crash) which affects the target operation, please notify the
targte-on-call immediately. Not notifying the target-on-call during these major events could result in target failure and major down time.
Spectrometer Data Acquisition
Note: This is for spectrometer DAQ. If you want
to cold start HAPPEX DAQ see
HAPPEX DAQ cold start.
-
The spectrometer DAQs runs on the a-onl account. Right HRS runs
on adaql2 and the Left HRS runs on adaql3.
Do the following at a shell prompt on adaql2 (adaql3) for the Right (Left)
HRS DAQ on the a-onl account:
> startcoda
- "startcoda" will run "kcoda", and will start all the components
for you.
-
Run Type = LeftHRS or RightHRS.
-
Details about Hall A Spectrometer DAQ and
trigger see Bob Michaels's guide.html
and guide2.html.
        HRS-DAQ CODA Configrations

        LeftHRS        Left spectrometer DAQ       on adaql3
        RightHRS       Right spectrometer DAQ      on adaql2
HRS-DAQ crates
| ROC |
Description
|
IP Address |
Portserver |
| ROC1 |
R-arm Lower Fastbus Crate |
hallasfi1 |
hatsv3 port 2 |
| ROC2 |
R-arm Upper Fastbus Crate |
hallasfi2 |
hatsv3 port 8 |
| TS0 |
R-arm VME/Scaler |
hallavme2 |
hatsv3 port 3 |
| ROC3 |
L-arm Lower Fastbus Crate |
hallasfi3 |
hatsv4 port 3 |
| ROC4 |
L-arm Upper Fastbus Crate |
hallasfi4 |
hatsv40 port 6 |
| TS1 |
L-arm VME/Scaler |
hallavme4 |
hatsv4 port 7 |
We will run the spectrometer DAQ concurrently with HAPPEX DAQ, and with VDCs off, for monitoring
the detectors and the quality of PID. Periodically we will run at lower current with VDCs on,
or under other special conditions, for such things as optics or Q2 measurement,
background studies, etc.
Here are the triggers on each HRS
- Short hint: Type "reboot" at vxWorks prompts of ROC logins.
-
For details about Hall A spectrometer DAQ
including reboot procedure see Bob Michaels' guide.html
and guide2.html.
Note: This is for spectrometer DAQ. If you want
to run CODA for HAPPEX DAQ see
Running CODA for HAPPEX DAQ.
-
Log in, if necessary, to adaql2 (adaql3) for Right
(Left) HRS as user a-onl
-
The Runcontrol GUI may be already running. If not, see section Spectrometer DAQ cold start. To start and stop
runs, click on the buttons Start Run
and End Run. Start Run is the same
as the sequence Prestart, Go.
-
For more details about Hall A DAQ and
trigger see Bob Michaels's guide.html
and guide2.html.
- There are scalers in the HRS DAQ, as usual, but also the
PVDIS VME crates consist of 4 scalers. Both these systems can be
monitored by xscaler.
Use hapc5 which is the PC on the top at the far
right of counting room console. Normally xscaler will be running, but
if not, log on as adaq, type "xscaler" and do what is commanded of you.
-
To start xscaler (though usually it is already running):
xscaler
(Everything is explained when you type xscaler, either on adaq or apar
account, or if you accidentally type it on on the local account hapc5.
Type 'xscaler' and see.)
-
For HRS you can find all trigger rates in Normalization
page. For PVDIS, there are 4 scalers on each spectrometer with obvious tab names.
Spectrometer Data Analysis
We will run the HRS DAQ and analysis concurrently with HAPPEX DAQ and with VDCs off for the following purposes:
- Monitor the status of the detectors, like for any HRS-based experiment
- Monitor the quality of the PID decisions made by PVDIS electronics.
- Measure the deadtime for PVDIS.
- FADC checks of selected high-rate signals, e.g. Cherenkov.
Periodically there will be expert-driven runs with VDCs on for the following purposes:
- Q2 Distribution measurement at low current.
- PVDIS deadtime study, including rate/current scan; tagger must be on for this kind of runs.
- Background Analysis from Aluminum End Caps, same current as LD2.
- Background analysis using field scan to simulate trajectories from inelastics and from pole-tip scattering.
Instructions for Podd analysis: click here for a one-page summary.
- Similar to other Hall A experiments that use Podd (the Hall A ROOT/C++ Analyzer)
- Run on adaq account on adaql4 - 7. NOT on adaql1,2,3.
- Type ``gopvdis'' (or ``goonlana'' -- both work the same)
- Type ``analyzer''
- In analyzer type ``do_all([run number])''
- Alternatively you can type for Left or Right arm:
- replay_L([run number])
- replay_R([run number])
- When using "do_all", a fairly obvious GUI pops up
with plots which you must check. Report all problems or strange
results in the HALOG.
- The ROOTfiles are stored in ./ROOTfiles.
Hall A Detectors
- Standard Detectors used for production running during PVDIS:
- S1 and S2 scintillators;
- Gas cherenkovs (with the extension box on both arms);
- lead glass counters: pion rejection on the LHRS and preshower/shower on the RHRS;
- HAPPEX Specific Detectors
- A whole host of beamline instrumentation too numerous to
mention here.
- Standard Detectors used for systematic studies (such as optics or Q2 measurements).
- VDCs (the HV must be turned off
during high rate running)
Left arm High Voltage screens are located within the Hall-A Main Menu
screen, under Lecroy HV
Beamline(Compton):
| Detector | Mainframe ID/Slot # | Card # | Channel # | HV (V) |
| Compton GSO | 2 | 11 | 1 | -1800 |
| Compton Finger | 2 | 11 | 7 | -2000 |
| Compton Finger | 2 | 11 | 8 | -1000 |
Right Arm Bottom:
Right Arm HV are no longer available through the Hall A Tools gui.
The VNC hvgui must be used to access that HV crate. See below:
- Starting HVgui for Right HRS detector HV
- login as adev@adaql5 (passwd on wall)
- type "start_hvgui" If the command fails with message that
a server is already running, this may be ok. It may only mean that the server
has already been launched. Or it could mean that someone is running the vt100 interface. Try the next step.
- If the gui interface does not open, type "hvgui"
Careful: in the listing below, the counting of channel numbers
starts with "0"; however, in the VNC display of "Measured Voltage", the
numbers at the left of the table start counting at "1", so there is an
offset of 1.
Right Arm (Lumi Det):
| Detector | Mainframe ID/Slot # | Card # | Channel # | HV (V) |
| Lumi #2 | | 15 | 1 | -625 |
| Lumi #3 | | 15 | 2 | -790 |
| Lumi #5 | | 15 | 4 | -780 |
| Lumi #6 | | 15 | 5 | -880 |
| Lumi #7 | | 15 | 6 | -690 |
| Lumi #8 | | 15 | 7 | -615 |
| Lumi #4 | | 15 | 10 | -1040 |
| Lumi #1 | | 15 | 11 | -505 |
NOTE: These Lumi voltages are nominally for 100 uA current.
- VDC Status
- VDC HV (IMPORTANT: HV must be turned off
during high rate running, i.e. HAPPEX production running.)
-
Bring up the HAC
control window (see
below)
-
In the "VDC HV" section, set HV to 0
-
In the "Miscellaneous" section, click on the Crate
Resets button.
-
In the "Hall A Slow Controls" window, press the
"Reset" button associated with the tripped HV crate.
-
Go back to set HV values to 4.0 kV
Helicity Controls
Changing the Half Wave Plate (up to date as of 9-23-09)
To change the state of the insertable half-wave plate (IHWP):
- Inform Hall B that we are about to change the half-wave plate.
If they are in the middle of the run, then ask them to inform you when
their run ends. Once we get the green light from Hall B, proceed into
the following steps.
- End the current HAPPEX run and the current Compton Run.
- Call MCC and ask them to change the state of the Insertable
Half-Wave Plate (IHWP) from In to Out or Out to In as appropriate.
- When
you see the state of the IHWP change in the HAPPEX feedback monitor,
type in an xterm (logged in as apar, make sure to log in with the
argument -Y):
flipper
-
The new setpoints should now appear in the HAPPEX feedback monitor..
ingeneral the Rotatable Half-wave Plate (RHWP) takes a minute or two to
change, but HAPPEX III uses the same RHWP position for both HWP states.
DO NOT START A NEW RUN UNTIL YOU HAVE VERIFIED THE
NEW SETPOINTS.

- Start a new HAPPEX run and a new Compton Run.
- Make a halog entry, saying you've changed the IHWP, and include
a screen capture of the HAPPEX feedback monitor (the "runbird" GUI).
- Write the new half-wave plate configuration on the white board.
Below is a sample of what the output looks like (from flipper).
[apar@adaql6 ~]$ flipper

****************************************

 Only run this program when the IHWP change has
 already been made.  If not, please Ctrl-C out now!

 Current slugnumber = 4
 Increment slugnumber? (Y/N)
Y
New slugnumber = 5

Current IHWP = OTU
Desired Settings for IHWP = OUT
     Hall-A IA = 4.79
     Hall-C IA = 5.00
     PC Pos    = 8.100
     PC Neg    = 6.610
     RHWP      = 1200
Current settings (to be changed)
     Hall-A IA = 4.79
     Hall-C IA = 5.0
     PC Pos    = 8.575
     PC Neg    = 6.125
     RHWP      = 1200
Writing the current seetings to file /adaqfs/halla/apar/feedback/IHWP.IN for the next flip back.
Performing Flip to IHWP = OUT settings
Halfwave plate OUT, Slug 5

Done... Please verify the new setpoints in the HAPPEX Feedback Monitor.

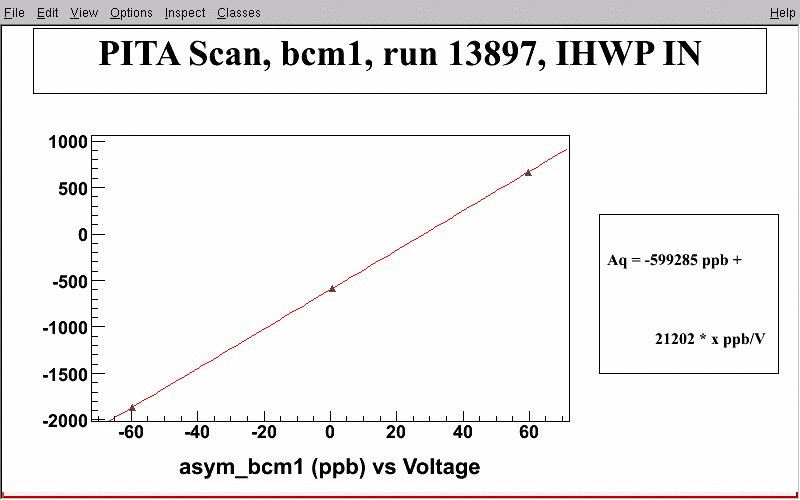
PITA Scan (up to date as of 11-14-09)
To measure the Polarization Induced Transport Asymmetry (PITA) slope:
- End the current PVDIS run and the current Compton Run.
- Check the status of the IHWP (IN or OUT), and set it to the state desired.
- Turn off the HAPPEX feedback monitor by typing
feedback off
in an xterm (logged in as apar). You should check that the feedback status is indeed off on runbird.
- Set the PC voltages appropriate for the IHWP setting. To set the voltages, open Hall Parity Controls from the Gun/Laser in the Accelerator Main Menu. We are using GUN2 currently. The voltages should be set for GUN2: PC (PITA) POS and GUN2: PC (PITA) NEG
appropriately. Check the run-sheet from the previous runs to make sure
the voltage you have is correct for the current IHWP setting.
If for some reason, you are not able to change the voltages on the Hall Parity Controls , call MCC and ask them to do so!

- Start greenmonster from apar@adaql1 by typing greenmonster.
- Go to the ScanUtil tab, and click on NOT CLEAN. Set the values on Set Point 1 and Set Point 2 to 0 . Click on Set Values, and check that the set points are indeed set to 0 by clicking on Check Status .
- Start a new PVDIS run.
- After about 200 events click on CLEAN .
- After about 10000 GOOD events (beam trip events are not GOOD events), click on NOT CLEAN .
- Set the PC (PITA) POS to the previous value + 1 and PC (PITA) NEG to the previous value -1 . For instance, if the previous POS/NEG were 8.5/6.2 , the new values should be 9.5/5.2 .
- Set the values on Set Point 1 to +60 . Click on Set Values, and check that it is set to +60 by clicking on Check Status .
- Click on CLEAN .
- Repeat steps 9-12 , but setting the voltages in the opposite direction. The new set points should be POS/NEG 7.5/7.2 , and Set Point 1 at -60 for the example above.
- After about 10000 GOOD events , end the PVDIS run, and run the prompt analysis in apar@adaql4 by doing gopan, prompt runnumber .
- After the prompt replay is done, run hapPITA.C gui by typing gopan, pan, then
.x lmacro/hapPITA.C(runnumber)
- Make a halog entry with the PITA slope, IHWP status, run # and the output plot of the gui with the PITA slope. Here is a typical PITA plot.

- Write the half-wave plate configuration on the white board.
HAPPEX Charge Asymmetry Feedback (up to date as of 9-23-09)
For a detailed description of the HAPPEX Charge Asymmetry Feedback, look at Bryan Moffit's entry from transvertisy.
- The only thing that needs to be changed after each PITA/IA
scan is the feedback slope, which is done in the file panFFB.db in
~/feedback/ in apar account.
- To turn charge feedback on, type feedback on
- To turn charge feedback off, type feedback off
- The charge feedback status should be checked in rundirb , which can be brought up by typing rundird .
Miscellaneous
-
Log in to adaql1 as user adaq
-
Type "bta"
- An attempt is made to automate the entries, but the shift leader
should check it based on their own estimates of ABU, BANU, etc.
-
In the HAC control
window, press the
"StripTool" label in tools launcher, which allows you to
plot any EPICS variables versus time.
-
On hopefully all adaq computers the command print
should work. Type print filename for a file named filename
and it will print out on the cha2hp printer in the back room. If you
want to print to another printer, type print filename
otherprinter. If that doesn't work try the command line below.
rlpr -Pcha2hp -Hjlabprt file.ps
Printing from Mozilla:
-
Use
File->Print...
-
Choose to print to printer, not file
-
Click on Properties (or Configuration?)
of printer
-
In the field for Print command, enter:
/apps/bin/rlpr -Pcha2hp -Hjlabprt
(you should only have to do this once for each account)
-
Click Print
Alternatively, you can have Mozilla
print to a Postscript file, which you can then print from the command
line.
Trying to print to cha2hp from a CUE machine (e.g.
jlabl1) using pdq will also fail. This
is not a problem specific to
the counting house computers. Only lpr and rlpr
will work with
this printer.
-
As user adaq on any adaq machine,
simply type
> halog
-
Entering text is easy and straightforward.
After submitting the entry, the white text on blue background in the
lower right corner of the window should read 'Entry
complete', otherwise something is wrong.
-
Entering graphics: Click Grab Screen in the
bottom button row of the halog window. The halog
window will disappear, and the window the cursor is in will
become the active window, its outline flashing. You can select any
window by
clicking in it on the left mouse button. You also can
select an arbitrary part of the screen by holding down the left mouse
button and dragging the cursor along. All the time a
rectangle will flash that indicates the selected area. Releasing
the mouse button will then cause this screen area to be
included into the entry. It will show up as a thumbnail picture
in the halog window, where you can discard it or accept it,
or go for a second screen grab. The images are in GIF format.
-
For more details about HALOG see halog HOWTO and
FAQ page.
-
Log in to as adaq on adaql4 or any
other adaq Linux computer.
-
Make sure CODA is running with beam on. Of course, that's the spectrometer DAQ, not the PVDIS DAQ. You'll need some triggers (adjust prescale
factors to get at least 50 Hz of something, if possible).
-
Type spot++ runNumber from any directory, after about 30
seconds, plots will pop up.
-
Hint: Type "spot help" to learn more options.
Other Problems
- Call Run
Coordinator
A.S.A.P.
Cell phone: 876-1787. Generic pager: 584-5411, but the RC might have
his own pager, see white board.
- Techs: See the white board. They normally want to be paged
before phoned at home. Always contact the Tech-on-call after confirmation from Run Coordinator. Never call any other Tech without permission from Tech-on-call.
- Computers: Page Ole Hansen (7627) or Bob Michaels (7410).
- PVDIS DAQ: Page Bob Michaels (7410) or R. Subedi (5752).
- Spectrometer DAQ: Page Bob Michaels (7410) or R. Subedi (5752)
(5064).
HAPPEX Home
webmaster Last modified: 10/28/2009who