Procedure for Longitudinal 3He Elastic Measurement
From Hall A Wiki
NMR Fequency Sweep Procedure
 Never do sweep in position other than 3He and Pickup !!!
 Never do sweep during target movement !!!
 Never do sweep when temperature not stable !!!
 Never do sweep during production !!!
Before an NMR Frequency Sweep, check NMR RF coils, pickup coils and Lock-in trigger connections:
- The connectors for pickup coils are in the front side of the rack ;
- The connector for RF coil is in the back side of the rack ;
- The connector for Lock-in trigger is in the back side of the top NMR lock-in amplifier and make sure it's connected to the cable labeled with Frequency Sweep;
- The pickup coil cable connected to Upstream is labeled as Target 2;
- The pickup coil cable connected to downstream is labeled as Target 3;
- For Vertical direction, use
  * Transverse pickup(Target 4) pickup coil for pumping chamber;
  * Longitudinal RF(Target 5) RF coil;
- For Longitudinal direction, use
  * Transverse pickup(Target 4) pickup coil for pumping chamber;
  * Vertical RF(Target 6) RF coil;
Make sure the EPICS Daemon is runing, it can be found in:
C:\AyeD\VI\Spin Flip\EPICS Daemon.viThen open the program for NMR frequency sweep:
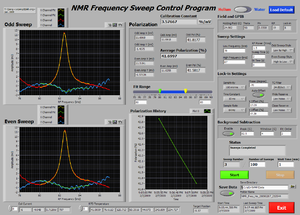
C:\AyeD\VI\NMR\NMR_Fequency_v7.vi
do the following steps:
- Run the program if it's not currently running;
- Select Helium;
- Press Load Default button;
- Make sure that Holding Field is about 25 Gauss, Sweep range is 77 to 85 kHz;
- Make sure that Save Data is pushed;
- Set Number of Sweeps to 1;
- Press Start button to start the sweep;
- The program can be stopped anytime by hitting the Stop button, other wise it will automatically stop after desired sweeps finished;
- Once all sweeps completed, a report screen with a screen shot will automatically popped out, please save the screen shot into the picture folder on desktop;
- Do not EXIT the program because it's monitoring the oven temperature.
- Post a Halog entry with the descriptions of
  * Field direction
  * Which RF coil
  * Which pumping chamber pickup coil
  * At what target position
  * Taking time
  * Target Polarization
  * the screen shot you just saved.
Field Rotation GUI
The field rotation code is saved at:C:\AyeD\VI\Field Rotation\3D_Rotation_v4.vi
Before rotate the field, make sure the following condition satisfied:
- Target ladder is not moving;
- Lasers are OFF;
- No other target events are running (EPR, NMR, current calibration and etc.)
- Because the timing is controlled softwarely by the computer, so close all other unnecessary programs and windows
To rotate the field to a desired direction:
- Find the code and run;
- Check current magnetic field direction: a green line in the figure;
- In the Destination panel, select the desired direction;
- Hit Load button. The desired direction will be marked in red;
- Check the field strength input and set it to 25 Gauss;
- Check the rotation speed is 1 degrees per step;
- Press Start Rotation/Ramping button, then hit Go ahead button;
- Wait until rotation finishes. If success, both the Field Match and Angle Match lights are ON.
- Make a Halog entry.
 If wrong direction is selected, do not panic because the field rotation/ramping can be
 stopped by pressing the Emergency STOP button. Please go to correct direction afterward.


